By: Barry Glicklich (President PBDD) Katherine Lato (VP-Communications PBDD) and Maryanna Milton (VP PBDD)
Original Release: December 7, 2016, links last verified 1/14/23
1 Introduction
This document presents an overview of the steps to refurbish computers based on the People’s Resource Center process. The basic steps for use with MS-Windows are described in this introduction and expanded upon in the document. Creation of these procedures requires computer proficiency in the following processes:
- Partitioning hard drives.
- Understanding of New Technology File System (NTFS), Master Boot Record (MBR), Partition Boot Record (PBR) also known as Volume Boot Record (VBR).
- Working with Legacy Basic Input/Output System (BIOS) settings or Unified Extensible Firmware Interface (UEFI) settings.
- Imaging or cloning hard drives to load an Operating System (OS) and software onto computers.
- Using database systems for tracking Microsoft Registered Refurbisher (MRR) requirements.
- Finding and installing drivers for hardware if the driver is not included in the Windows software.
The basic process for refurbishing computers is as follows:
- Determine a method for creating a standard load of the Operating System (OS) and Program Software to be used on the computers to be refurbished.
- Determine a method for copying (cloning or imaging) the standard load onto the computers being refurbished.
- Determine a disk data destruction (wiping) mechanism to be used.
- Register on the Microsoft Registered Refurbisher (MRR) website to get access to Windows and Office licenses for refurbished computers. The website is used to get product keys for the Microsoft software as each computer is refurbished.
- Develop a database to track the Windows and Office licenses used, the computers upon which they are installed, and the user that receives the computer.
- Develop partners to donate computers.
- Develop the specifications for donations to successfully use the OS and software you will install. (Computer users don’t like computers that are too slow!)
- Find an EPA-registered computer recycler who will take computers and parts that do not work or are too old to use.
- Develop a procedure for your employees or volunteers to follow to refurbish the computers, including imaging or cloning the standard load onto the computer hard drive, licensing the OS and Office on the MRR website and testing to ensure the computer works.
- Develop a system for your clients or customers to request and then receive a computer.
The rest of this document will cover specific activities in detail.
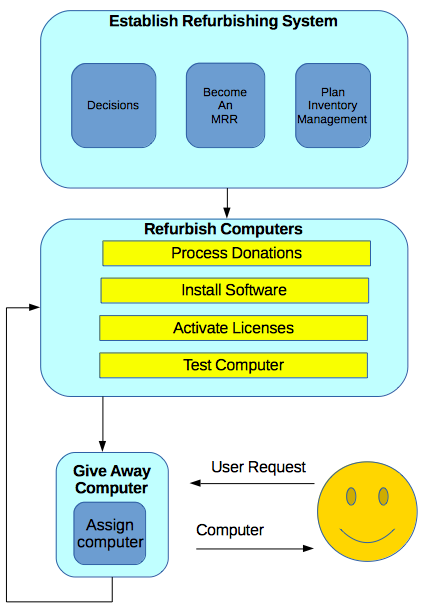
2 Setting up a refurbishing system
2.1 Determining copying mechanism and software baselines
- Determine whether imaging or cloning will be used to load the Operating System (OS) and any software to hard drives for each computer. If a small volume of OS disks (i.e. computer builds) will be needed daily, imaging can be done from CD, Network, or USB onto each computer. If many OS disks (i.e. computer builds) are needed daily, a cloning system for copying the load from a primary hard drive to multiple hard drives may be needed. The software and hardware will be different for each method.
- Information on imaging vs. cloning can be found on the web, such as http://www.pcworld.com/article/2029832/backing-up-your-entire-drive-cloning-vs-imaging.html
- For small volumes, information can be found on WikiHow (http://www.wikihow.com/Image-a-Hard-Drive) or at imaging software makers such as Acronis or Todo-Backup (http://www.todo-backup.com/backup-resource/copy-and-clone-hard-drive.htm)
- For large volumes, read “Five Easy Steps to Smarter Systems Imaging” at https://www.quest.com/whitepaper/5-easy-steps-to-smarter-systems-imaging827043/ or info from “smartImager” at https://www.smartimager.com/index.html?gclid=CJ2eptiE5M0CFQcMaQodKGsF6g.
- Select imaging or cloning software to work with the system or hardware to be used for imaging or cloning hard drives.
- Select other software for the load: Office, Flash, Java, Firefox, Chrome, Antivirus, Anti-malware, Typing Tutor, DVD Player, Etc.
- Load Windows Operating System and all desired program software onto one computer for load maintenance of the master disk. Set desktop and user preferences. This computer will be used to keep all software up to date on this master disk.
- If an imaging method will be used, an image for loading onto all other machines will be made from this master disk and updated regularly.
- If using a cloning method, create a clone of the master disk for use as the cloning source.
2.2 Becoming a Microsoft registered refurbisher (MRR)
- Register with Microsoft for the Microsoft Registered Refurbisher Program. Information and registration can be found at https://www.microsoft.com/oem/en/licensing/sblicensing/pages/refurbisher_programs.aspx
- Order license stickers for desired version of Windows and Office.
- Use one set of license stickers for the Master Load Maintenance. Then go to step four of “Determining copying mechanism and software baselines.”
- Use one set of license stickers for each computer that is built with the load.
- Continue on the Microsoft Registered Refurbisher site for Windows MRR Licensing and Activation section.
2.3 Management of inventory and licenses
- Define a method for identifying each computer built with an ID number.
- Define a database system or Excel spreadsheet to track the computer ID number, to whom the computer is given, and both the Windows and Office COA and Product Key that are assigned to that computer ID.
- Continue with the Windows MRR licensing and activation section.
2.4 Acceptance criteria, logistics and key partnerships
- Define computer hardware requirements for the software being used: processor speed, HD size, DVD drive, RAM, etc.
- Define BIOS settings for optimum imaging and maintenance. (BIOS time and date must be set correctly for proper licensing.)
- Develop sources for donated computers – schools, hospitals, businesses.
- Find a recycler for computers and parts that do not work properly.
- Identify working space, storage space, equipment needed (vacuum, tools, etc.)
2.5 Load maintenance
- Track updates needed to Windows, Office, Java, Flash, Antivirus, etc.
- Update the master disk on the master load computer.
- Create new image of master disk if an imaging system is used
- Depending on the type of cloning system used, a new cloned disk of the master disk of the master disk may be needed.
- Note that there are specific requirements for preparing loads to be installed on refurbished computers. Refer to the latest Microsoft Registered Refurbisher Program Guide to understand these requirements.
3 Refurbishing computers and installing software
3.1 Checking donated computers
- Receive donation and provide donor with receipt.
- Add donation to inventory of donated computers.
- Select computer and verify that it meets the minimum requirements.
- If the computer or some of its components don’t meet specifications:
- Replace any components that don’t meet spec, increase RAM as needed so the computer can be used. Recycle any parts that cannot be reused.
- Wipe the hard drive if it does not meet specs, and recycle.
- Salvage the parts that can be reused.
- Recycle the parts that cannot be reused.
- Clean computer (removing dust, etc.)
- Make sure all components function properly – power supply, HD, Fans, DVD, etc. Replace as needed. Recycle any parts that do not function properly.
- Upgrade RAM, HD, DVD, etc. to meet requirements, if needed.
3.2 Determine whether computer uses legacy BIOS or the newer UEFI
- Standard BIOS (Basic Input Output System) has been used on computers for many years. It allows common methods of partitioning hard drives, booting into the OS, and loading an OS or image onto a computer. BIOS is fundamentally a solid piece of firmware.
- UEFI (Unified Extensible Firmware Interface) is a complete re-imagining of a computer boot environment, and has almost no similarities to the PC BIOS that it replaces. It is present on newer computers and laptops that have at least dual- or quad-core processors. UEFI is a programmable software interface that sits on top a computer’s hardware and firmware (UEFI can and sometimes does sit on top of BIOS). As a result, UEFI almost resembles a light-weight operating system. A computer boots into UEFI, an arbitrary set of actions are carried out, and then it triggers the loading of an operating system. For more info on UEFI see the following sites:
www.UEFI.org, and
www.extremetech.com/computing/96985-demystifying-uefi-the-long-overdue-bios-replacement
- The process for imaging or cloning will be different depending on whether the computer has Standard BIOS or UEFI. If UEFI has the option to use standard BIOS, this should be taken whenever possible to simplify the process of loading the OS and software.
3.3 Installing software on computer with legacy BIOS
- Boot into BIOS and adjust settings as defined. Date and time must be current for proper licensing.
- Reboot with partitioning software and wipe the hard drive. Create new partition and set as “Active” and “Primary” partition. Example software includes Partition Magic (free).
- Use a program like Boot Ice (free) to reset the MBR and PBR on the hard drive.
- Reboot with Imaging SW to load the image using the method defined. The image can be on a USB drive, a CD or DVD, or stored on a network drive. An example of free software is GImageX.
- When imaging is complete, reboot into Windows and wait for the setup process to complete.
- If asked to activate when Windows starts, click on “Ask Me Later.”
- Check Device Manager to ensure that all drivers are loaded properly. Find and load drivers for any devices for which Windows did not find drivers.
- Check for any critical Microsoft Updates that may have come since the last load maintenance.
- Update antivirus and anti-malware software.
- Assign computer ID number
- Proceed to Windows licensing and activation steps.
3.4 Installing software on a computer with UEFI
- This process is more complicated than that described for Legacy BIOS, above and should be done only by someone that has studied UEFI and this method extensively. More info on UEFI can be found at www.UEFI.org. Other aspects of this system can be found through a Google search.
- This can only be done if Windows 8 or later is to be installed. See https://technet.microsoft.com/en-us/library/cc749064(v=ws.10).aspx for more info on this process.
- The hard drive receiving the Windows OS must be configured as outlined in the following steps.
- A command line method (or script) can be used to partition the hard drive. The “diskpart” command is a common method for this. Three partitions (one for the efisys system software partition, one for the MSR partition, and one for the primary partition are needed.
- The efisys partition must have the drive letter “S”, a size of 99 MB, and is formatted as FAT32.
- The msr partition (Microsoft reserved) is given a size of 300 MB.
- The primary partition can be assigned a descriptive label, formatted as NTFS, and assigned an arbitrary drive letter other than “C”. (If loading the image from a USB drive, the computer being imaged will assign the USB drive the letter “C”). This primary partition uses the remaining disk space.
- The Imagex command can be used to load efisys.wim to the “S” partition.
- The Imagex command can be used to load the Windows image onto the primary partition.
- The boot partition should then be fixed with the “bootrec /fixboot” command.
- The Windows Boot Configuration Data (BCD) must be reset to boot to the Windows partition using the “S” (UEFI) partition.
- The Windows software can now be loaded on the drive.
Again, this UEFI method should only be used by personnel well versed in this technology and the methods for creating the partitions, loading the software, and booting in a command line environment for UEFI systems. Whenever possible, use the standard BIOS method.
3.5 Windows MRR licensing and activation steps
- Open “Computer/Properties” (on Windows 7) or “System” (on Windows 8 and higher) and click “Change Product Key” under the “Windows Activation” header.
- Log into Microsoft MRR Website. https://www.ifixit.com/Wiki/Microsoft_Refurbisher_Program
- Follow instructions on the MRR Website to enter the NEW Windows COA number (from the new Windows License sticker) to get the Product Key for the new version of Windows. Then enter the Existing Windows COA number (from the Windows License on the computer). The language preference and Site using the license are also entered. Follow the prompts to “Submit” the information and get the new Product Key and EULA files.
- On the MRR Website, download the PDF file of the EULA and the CSV file with the Product Key for the Windows COA entered.
- Save these two files for use in your Database system to connect them to this computer ID.
- Copy the Product Key from the MRR website
- Paste (or enter by typing) the Product Key from the MRR website into the dialog box opened in Step 1, above, to enter your new Product Key for Windows Activation. Continue to follow the prompts to Activate Windows online.
- Repeat for Office if loaded, next section.
3.6 Office MRR licensing and activation steps
- Open “Control Panel” then open “Programs and Features” and select the version of Microsoft Office from the list of Programs. Click “Change” from the options at the top of the page.
- A second method: open “Settings” then open “System”, “click Apps and features” in the list on the left side of the “System” window, scroll to the bottom of the list on the right side of the “System” window, and finally, click “Programs and Features”. In the “Programs and Features” dialog, click on Microsoft Office in the list of programs, and select “Change” from the options at the top of the page.
- Select “Enter Product Key” in the “Change” dialog box.
- Follow the instructions to get the Product Key for the new version of Office:
- If continuing after getting a Windows Product Key, click on “Request New” at the top of the page.
- Follow the instructions on this page to enter the New Office COA, the proper form for the existing COA number, the desired language, and the Site using the license, to get the product key for the new version of Office.
- On the MRR Website, download the PDF file of the COA and the CSV file for the Office product key.
- Save these two files for use in your Database system to connect them to this computer ID.
- Copy the Product Key from the MRR website
- Paste (or enter by typing) the Product Key from the MRR website into the dialog box to enter your new Product Key for Office. Follow steps to complete this entry.
- Open Microsoft Word and follow final instructions for activation on-line.
- Continue on “Test computer and update database.”
3.7 Test computer and update database
- Reboot computer and check “Computer Properties” to ensure Windows is activated.
- Open Microsoft Word to ensure Office is activated (Can type into and save a Word doc.)
- Check CD/DVD drive with a CD and/or DVD to make sure that playback and sound work.
- Check Windows Updates.
- Check Device Manager to ensure all drivers are installed properly and up to date. Windows 7, 8 and 10 will install most common drivers, but some computer hardware may need drivers that are not included with a particular version of Windows. A collection of various hardware drivers can be accumulated and stored to install on computers as needed.
- Clear all existing Restore Points and create a “New System” restore point for the licensed computer. This will prevent the future computer user from accidentally using a restore point from before the time the computer was licensed and activated.
4 Giving away computers
4.1 User requests a computer
- Confirm user eligibility (client, computer class attendee, etc.)
- Note special requests (physical size, memory, etc.)
- Continue with computer assignment.
4.2 Computer assignment
- Assign computer to user.
- Record COA and Product Keys for the specific Computer ID number.
- Using Excel or database system, record the following:
-
- Computer ID number
- COA and Product Key for Windows and Office
- User assigned to use the computer.
- Give user the computer and instructions for assembly and usage
- Help user load computer into vehicle
5 Conclusion
This paper outlines a specific set of processes for refurbishing computers for use with MS-Windows, procedures in use by People’s Resource Center as of winter, 2016. The intent of this paper is to describe these procedures so they can be used as the basis for other programs.